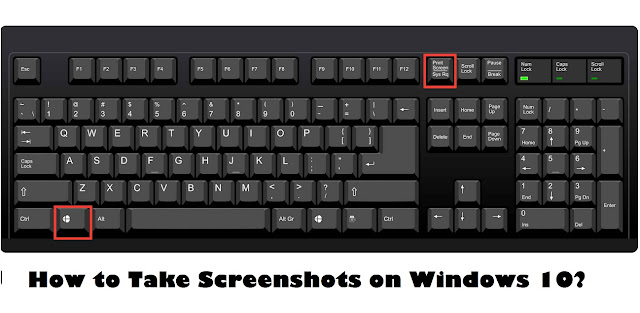
Taking a screenshot is not a very complicated task, but users need to decide what type of screenshot they need, especially on Windows 10. While working on the computer, often you may need to take screenshots for sharing the snap of either the full screen or an active window. In case you are a game lover, then you must want to capture the snapshot of all your highest achievements and rewards as well.
Windows 10 provides a broad range of built-in tools for its user to capture the desired screenshot. You can use Windows apps that let you capture screenshots. This article will help you to take screenshots right on your Windows 10 device with ease:
Capturing Screenshots on Windows 10
Built-in Tools of Windows 10
Do you want to capture screenshots on your device running on Windows 10 OS? Don’t worry; Windows 10 offers several exciting tools that will help to capture your desired snapshot.
- Print Screen- Keyboard Shortcut: The Quickest and Easiest Way
One of the easiest ways to capture screenshots directly on Windows 10 is the keyboard shortcut by tapping the PrtScn tab once. Once you press the PrtScn key, Window will automatically capture the entire Window as a snapshot on your device, and it will also save the image to your clipboard. To know the complete PrintScreen procedure, follow these guidelines:
- At the start, hit the Print Screen (Prt sc or PrtScn) key on your keyboard.
- Then, you will get a copy of the image into your clipboard. It won’t automatically save to your device.
- Now, launch any of the Microsoft Office apps or any other program app. Then press the Ctrl and V tab simultaneously on your keyboard. This action will paste your screenshot.
- Finally, hit the File tab and then select the option “Save As” to store your image.
Using Window + Print Screen key
The combination of Win and PrtScn key will also help you to take a screenshot effortlessly. It doesn’t need any third-party image editor to save your screenshot. Once the screenshot is captured, it will automatically save to your screenshot folder.
- Tap the Window logo and Prt sc key simultaneously on your keyboard.
- Once you tap these two buttons, then you will find that your screen becomes dim for a couple of seconds. It means that the screenshot procedure is successful.
- Now, tap the File Explorer section and then hit the Pictures tab.
- At last, press the Screenshot button to find the screenshot you have captured.
Using Alt and Print Screen Keys
If you desire to capture a screenshot of your active Window, you can use the keyboard shortcut combo keys that are “Alt +Print Sc.” Follow these steps to know the complete procedure:
- First and foremost, hit the combo keys: Alt and PrtScn.
- It will capture the snapshot of your active Window, and the same will be copied into your device clipboard. Therefore, launch any image editor on your device like MS Paint and then paste it for saving into your directory.
Using Window Logo and Volume Down Buttons (For Surface users)
- At the start, tap and hold the Window logo tab.
- Then, press the volume down button on the keypad. It will be available at the side panel of your tablet.
- Now, your screen will dim for a while, and you get your screenshot saved to the Pictures sections located into the Screenshot folder.
Using Screen Snip Tool
Get the screen snip tool from the Action Center. It will quickly launch the app “Snip and Sketch” on your system’s window.
- First of all, tap the Window logo and “A” button on the keyboard to open the Screen Center.
- After that, hit the Expand tab to see all the available titles.
- Then, locate and choose the tile “Screen snip” there.
- Finally, you have to choose the screenshot type option and then capture it on your machine.
Using the Snipping Tool
It’s one of the oldest desktop apps available, and now it is also available on Windows 10 for capturing snapshots. It offers various snipping features with some editing and customizing tools.
- Firstly, open taskbar search by tapping the Window and S keys simultaneously.
- After that, enter “snipping” into the search field followed by the Enter key.
- When the Snipping Utility prompts up, hit the Mode tab and then choose the type of snip, otherwise hit the “New” button there.
- Then, choose the option “Save As” located at the uppermost section to save the screenshot into your preferred location and format.
Game Bar
- Launch the Game Bar Using Window logo and G tab shortcut button.
- Once the app appears on the screen, hit the screenshot tab there. Alternatively, tap the default keyboard shortcut: Win + Alt + PrtScn while playing your preferred game.
Snip and Sketch
- At the start, hit the Win logo button and then input “Snip and Sketch” into the search bar followed by the Enter key.
- Once the app launches on your screen, hit the New tab there located on the uppermost left-hand side edge. It will quickly open the small box at the top portion of your Window.
- Now, choose the type of snip that includes the Freeform, Rectangular, Full Screen and Windows respectively.
- Reboot the device at last.
Note: There are several other options that a user can use like Web Browsing screenshot tools, and third-party applications.
Conclusion
Many times, users need to capture screenshots directly on their device to share with their family and friends. Windows 10 provides several methods to capture snapshots such as Windows 10 built-in tools, browsers and third-party apps.

Comments
Post a Comment